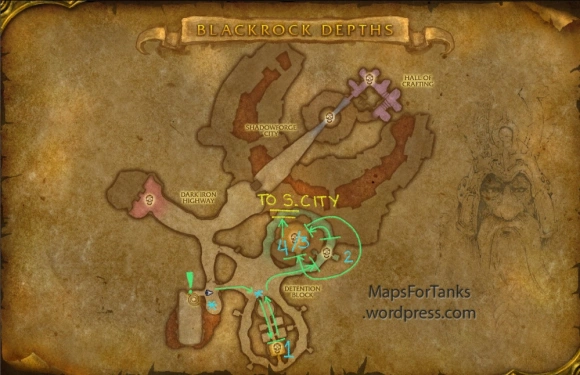
Level Range: 47 – 61
Special LFD Notes:
If there IS NO Mole Machine just inside the entrance, you are in
BRD: Detention Block (Lower), you will only need to kill High Inquisitor Gerstahn. Bosses: 1 (2 & 3 optional)
If there IS a Mole Machine just inside the entrance, you are in
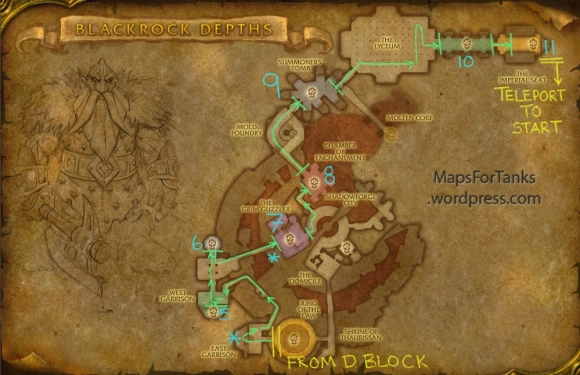
BRD: Shadowforge City (Upper), you will only need to kill Thaurissan. Teleport to ‘Just Past Grim Guzzler’ using the Mole Machine. Bosses: 8 – 11
The full guide is intended for achievement hunter and completionists to go all the way through from the beginning to the end of the instance.
Special Notes: Blackrock Depths is a long instance- a really, really long instance. With 14 boss encounters (some encounters have more than one boss), expect to spend at least an hour clearing it.
Moving between the two maps of the instance (‘Detention Block’ and ‘Shadowforge City’) can be confusing. It helps to mentally break it into chunks if you want to remember how to get through it without a map.
Detention Block Part I (LFD: Detention Block): High Inquisitor Gerstahn, Lord Roccor, Houndmaster Grebmar, Grizzle.
Pass through the Ring of Law to get to Shadowforge City.
Shadowforge City Part I (LFD: Shadowforge City): (Optional: General Angerforge, Golem Lord Arglemach, the Grim Guzzler situation), Flamelash, the Summoner’s Tomb situation, Magmus, and Thaurissan.
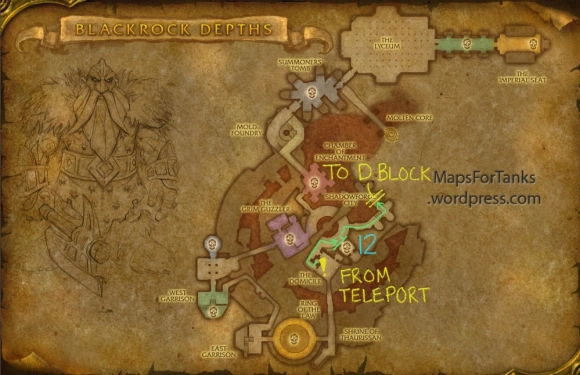
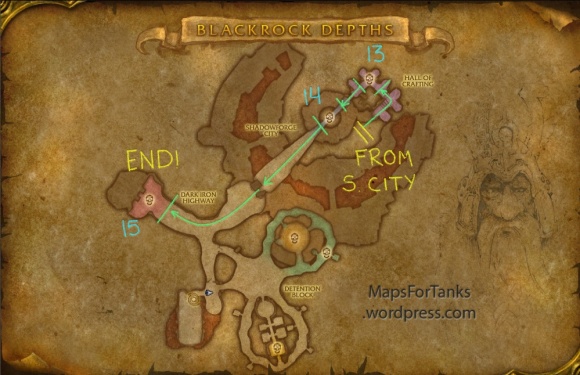
Shadowforge & Detention Block Part II: Teleport out of the dungeon and then back in to get to the start of the instance. Take the Mole Machine to ‘Into The Domicile’ to hit the Black Vault situation, Incendius, and Bael’gar.
A ‘*’ on the map indicates quest activity.
Thanks to the many friends on Twitter who lent invaluable assistance to this instance.
Maps:
Bosses:
- High Interrogator Gerstahn: Protected by two guards and two dogs. She casts shadow spells- a shield, Shadow Word: Pain, Mana Burnand Psychic Scream- and does melee damage.
- Lord Roccor: Pats around the Detention Block area. Clear out nearby mobs before you take him on. Performs melee damage with Flame and Earth Shocks, and a stun Ground Tremor.
- Houndmaster Grebmar: Two hound mobs surround him, and two hounds guard him. Try to pull and kill the independent groups of hounds to the left and right of the doorway before engaging him. He performs melee damage with Bloodlust and a Demoralizing Shout.
- Grizzle: Walk into the Ring of the Law to start the Ring of Law event. Grimstone opens the three gates surrounding you in succession to release waves of mobs. 1) about 10 Dark Screechers and 2) Grizzle, a large melee troll with Cleave, Frenzy, and Ground Tremor. When he is defeated, the door to the East Garrison will open, which leads to Shadowforge City.
At the star on the map, unlock the Shadowforge Lock by clicking on it (it’s down a flight of stairs in front of you as you enter from the Ring of Law). - General Angerforge: Surrounded by four guards. Take the guards out first- they’re easy- and then hit the General. He has an Enrage and Sunder Armor, and is melee. Immediately after his death, a mob of seven spawn. Take out the healers first.
- Golem Lord Argelmach: Just down the hall from Angerforge is Argelmach. He is guarded by two golems; first take the blue one out, then the pink one. Argelmach himself casts Chain Lightning and Shock and has a Lightning Shield. On to the Grim Guzzler!
- The Grim Guzzler Situation: There are four potential bosses in here, and you have multiple options for engaging them. You can
a) Skip it: It’s long, hard, and difficult to explain to a PUG.
b) Hurley Blackbreath / Plugger Spazzring / Ribbly Screwpot: Kill Hurley (break all the casks on the lower level to aggro him), Plugger (steal items off the table near him), and Ribbly (just talk to him) as part of both an Ally and Horde quest chain. Killing Plugger or Ribbly has always resulted in a completely aggro’d bar, in my experience.
b) Private Rocknot Quest /Phalanx: Give Private Rocknot ale from Plugger until he freaks out and starts hitting the large casks, which summons Phalanx, an optional boss. Pull him into the hall outside the Grim to avoid aggro’ing the whole bar (you can do this without killing the other three bosses).
Don’t fall off the edge of the hall like I did when I was running this instance while researching this map. Put yourself against the wall because Phalanx has a knockback that will throw you off the edge.
If you fall off, either your group will have to come down and fight Lord Incendius with you, or you’ll have to die and use the Mole Machine transporter to get back.
d) Leave without killing anyone
Whatever you do, try not to aggro the whole bar at once.
You won’t be able to get out once you start killing the three quest bosses. You have to either kill patrons so the guards open the door, perform the Rocknot quest to summon Phalanx, or kill Spazzring for the key. - Ambassador Flamelash: Summons multiple waves of Burning Spirits. When they reach him, they give him a stacking major buff that has no upper limit that I could see. Assign a DPS to kill the spirits before they reach him, and try to burn him down quickly.
- Summoner’s Tomb: Challenge Doom’rel to awaken the other seven bosses. They aggro in order on a timer, NOT as the previous boss dies, so kill them quickly: Anger’el (warrior), Seeth’rel (mage), Dope’rel (rogue), Gloom’rel (warrior), Vile’rel (shadow priest), Hate’rel (warlock), Doom’rel (warlock)
- Magmus: In the Lyceum, look for the Flamekeepers (red hair, reddish clothing) to get two flames with which to light the two braziers near the door. All the mobs in the room respawn extremely quickly. When Magmus is engaged, golems in the recessed corners will blow fire into the room. Magmus casts Fiery Burst, electrical, and melee damage.
- Emperor Dagran Thaurissan and Princess Moira Bronzebeard: Avoid killing Moira Bronzebeard, who will become friendly after Thaurissen is dead. Thaurissen uses Avatar of Flame to become immune to magic damage (he gets larger when this is in effect), and can cast a HoT on himself. There is no need to do a full clear of his throne room.
- The Black Vault: Teleport out of the instance and back in to get to the entrance. Take the Mole Machine to ‘Into the Domicile’ and go up the stairs to your right. Clear out the anteroom and engage Warder Stilgiss and Verek. Stilgiss is a frost mage; I take him out first, personally. Open all of the vaults (requiring 12 Relic Coffer keys) to spawn Watchman Doomgrip when the last one is opened. The statues in the room will immediately come to life and start attacking you as well. When he dies, a special slot will open under the final vault to reveal the Heart of the Mountain and a secret safe.
Just Because BRD Isn’t Confusing Enough: When you read the plaque under the Dark Keeper’s portrait, located just outside the vault room, one of six Dark Keepers will spawn somewhere randomly in the instance, and drops the key to the big Dark Coffer. The name and location of the Dark Keeper who spawned is on the plaque. - Fineous Darkvire: Throws bombs and is protected by three dwarf craftsmen and a golem. Also uses Kick and Holy Strike for major damage; take him and the golem out first.
- Lord Incendius: Guards the Black Anvil, if you happen to be an interested Blacksmith. Casts Firy Burst, Firestorm, and Firy Volley, and can knock you off the platform. Put your back against the anvil and push him as close to the edge as you can.
- Bael’gar: Summons multiple Spawn of Bael’gars; try to get them down quickly and then go back to hitting Bael’gar. If you don’t have the key to get there from Incendius, just zone out and back in, and run to him from the entrance.
Warrior Says…
If you can finish a full-clear BRD with the same party members you came in with, you can call yourself a real tank.


